Home | Home Education | Parties

Liberty Hill House has MOVED!!!
Check our our newest posts at www.LibertyHillHouse.com

Wednesday, July 29, 2009

Nim's Island Activities - Chapters 5&6

~ Endangered Green Sea Turtles ~

Animals are irresistible, and the fantasy of becoming close friends with a sea turtle has captivated my daughter.  She has been on her belly in the middle of my living room playing with her tiny turtle figurines all week.  

She started this game after we first read this week's chapters of Nim's Island.  It begins with Chica the green sea turtle returning to lay her eggs.  
"Nim squatted beside her, watching quietly in the darkness and wiping away sand from the turtle's watery eyes, until the hole was just as deep and wide as it needed to be."
 Wouldn't you love to live like Nim too? 
No, those aren't the tiny turtles on my living room floor (obviously).  This photo was taken at the Boston Museum of Science's "Crittercam" exhibit during our vacation last week.  It was fascinating!  It is a traveling display, so if you have any chance to see it in your area, go.  

Our primary video link for this lesson came from PBS Kids (we also saw a Britannica clip and this one showing a turtle hatch).  It energetically shows two young boys assisting researchers studying baby sea turtle survival rates in Florida.  The boys dig up the nests from which most of the turtles have already hatched, collect the live turtles remaining, and count the remaining deceased turtles and shells.  

We took the idea from the video and created our own turtle research experiment.  I put a few turtle toys inside old plastic easter eggs along with many empty shells and then hid the entire nest.  Some turtles were labeled as "dead" by putting black x's over the eyes with tape.   The kids were sent off to search for the hidden turtle clutch and they happily bounced  throughout the house exploring possible locations for the eggs.  After it was found they documented the location that they found the nest and then worked together to discover how many babies had survived.  

We created sweet turtle clutches for our notebooks by stapling a sanding disk to our page.  On top we glued "Chica" and below the flap they pasted the turtle eggs.  Later we will add a few elements that we found in HSS' sea turtle unit  and in this fun activity book.
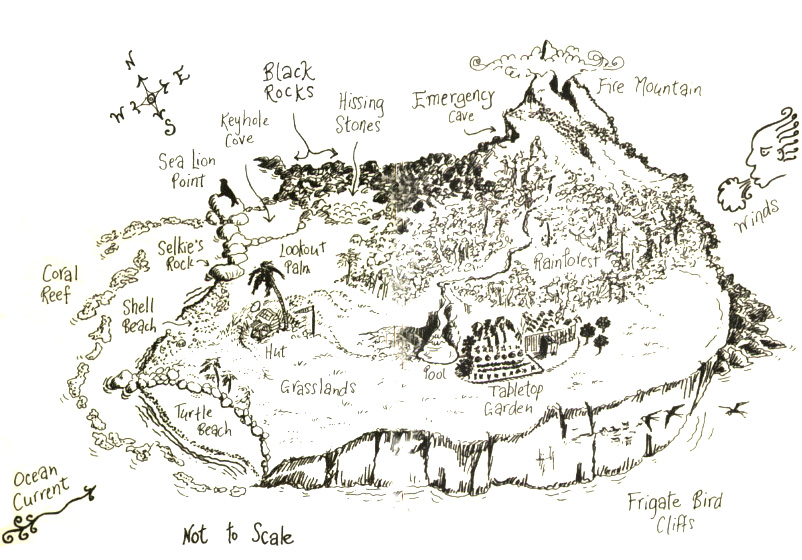
The salt dough islands that we made last week were finally completed today.  We made small boats out of folded tin foil, and used quilting pins and a small triangle of paper to make the sail.  We then added Jack by coloring a toothpick with markers.  Around the boat the kids placed dots of glow-in-the-dark paint for the bioluminescent plankton that Jack was studying.  


We also made a tiny Nim out of a toothpick.  We drew on a small face, colored her clothing, and then dipped the top in rubber cement and pressed a tiny amount of cotton on the top for her "wild hair."   Our maps were originally mounted on foam board, so we attached the figures by simply pressing the pins and picks into the foam.

I was going to have them add a small compass rose to their maps, but I forgot - there is always next week.
 
Oh, and remember that painting that I was worried about last week?  Well I decided to skip it.  The group used markers to add the most important elements, like the volcano and garden, but I waited until later in the day to let my own kid paint.  As it was, I somehow ended up with 12 paintbrushes to wash.   That's enough for me.
Want to share our Nim's Island adventure? Join our Flickr pool to allow your kids to join in the discussion, and share their own photos and videos.

Monday, July 27, 2009

Heirloom Cradle

In my husband's family you will find a group of devout "savers."  They have (and still use) great grandma's recipes and grandpa's tools, an uncle's woodworking projects and cousins' photographs.  Sentimental things quietly decorate their shelves and drawers.  My own family isn't like this.  Some special things have been saved, an old quilt or a trunk from my Grandpa, but in all reality, it is not much.  We seem to value organization over sentimentality - a choice that keeps our homes less cluttered, but deprives us of the tangible memories that "things" have.  
My favorite of my husband's family treasures is an old cradle.  All of my children have spent the first four months of their little lives sleeping in this very special heirloom.  It originally belonged to their Great-great grandmother (did you catch that?  TWO greats), and we are sure that "Great-Nina Grace" slept in it along with some of her siblings.  Since then, it has held their grandfather, great uncles and aunts, their daddy, uncle, and many cousins.  It has gone through a few changes; being painted green by their Grandpa right before Uncle Herbie was brought home from the hospital, and then stripped back to it's natural color again by my husband when we were eagerly awaiting our daughter.  What a fun heritage to share!  

This cradle has been living in our home for the past 6 years.  It stays right beside my bed when they are little so that I can poke my hand or foot out from under the covers to gently rock them back to sleep if they begin to fuss at night (putting off the inevitable middle of the night feeding).  I love the way it looks, I love the easy access it gives me to my babies, but most of all I simply love it's solid link to so many happy memories.  

Our little one is now 3 months old, and very close to the "able to roll over" stage in which we usually move them to a crib.  She has been sleeping through the night since she was 7 weeks old, so she really doesn't need to be in our room anymore, but I hate to let this stage end.  It is just so precious to be able to listen to your child's gentle breathing at night.  
One day I will need to let this cradle move not only out of my room, but out of our house.  On to a cousin or my sweet sister-in-law when she and her husband decide that it is time to start their family.  It will be a wonderful and sad day.  Wonderful because passing things on is what heirlooms are all about, but sad because it won't be here in my house reminding me of just how long and exhausting those first few months of my babies lives seem, but how quickly they pass.  Reminding me that many of those babies who slept there are now parents, or grandparents - or more - and my babies will one day be so too.  

I hope and pray that this cradle eventually makes it's way back to my own children when they start their families.  That they will be able to sit beside it rocking their little ones and thinking that their own mommy did the exact same thing a generation ago, realizing just how precious the time with their own little infant is.  I look forward to the time when they can add their own stories to the ones of our family.  

New beginnings mixed with old memories are a great combination to pass on to the next generation. 

Monday, July 20, 2009

Nim's Island Activities - Chapters 3&4

~ How Do Islands Form? ~

Today we started our day in a very Nim-like fashion.  The kids woke their dad with squeals of "can you open our coconut!"  Poor guy, and on his vacation no less.  They drank some of the coconut milk, and didn't seem too impressed, but they were thrilled to watch as he smashed the husk on our stone step to reveal the meat inside.  They happily ate "banana-and-coconut mush" (oatmeal with bananas and coconut) for breakfast and then brushed their teeth Nim style -  outdoors with much giggling and searching for a plant "that needs the spit."
Our focus this week is Island Formation.  We started with a very simple demonstration of the concept of plate-tectonics (using chocolate covered marshmallows YUM!)
When force is applied the crust (chocolate) cracks and moves, sometimes revealing the deeper layers of the earth - told you it was simple.  We talked about the movement of these plates along fault lines, and how these weaknesses in the earth's crust give magma a chance to reach the surface, thus creating volcanoes.  Those volcanoes in turn can create oceanic islands.  

We watched a few videos depicting the formation of volcanic islands.  One about Hawaii, and another about the formation of Surtsey which is good, but the audio quality is lousy, so turn your speakers WAY up.  We also enjoyed flipping through the photos taken by the crew of the Maiken when they accidentally stumbled upon the birth of a brand new island.  These pictures are impressive!  The kids had all sorts of questions about this - was the boat okay, can the volcano kill people, how long did it take, and on and on.  All good questions! 

Our activity today was to make Salt-dough maps as suggested by Professor H.  We had a good time laughing at his antics as he tried to deal with dough that was far too wet.  The kids were all feeling very sure of themselves and proud of their own sculpting abilities after seeing his ridiculous attempts to work with that dough. 
This is the recipe for Salt-dough that we used (for 6 kids):
4 cups flour
2 cups table salt
2 Tablespoons cream of tartar (to keep the finished product from cracking)
+/-   2 cups of water 

- Mix the dry ingredients together.  Add approx 3/4 of the water then slowly add more until the dough just barely starts to form a ball and pull away from the sides of the bowl.  
- Knead the dough for a few min (I let my kitchenaid do the work) to make the dough softer and create a better consistency.
Professor H did a good job demonstrating the different landforms with the dough, and we will be adding these pieces to our notebooks.  
For our final craft we borrowed an idea from Tracey and added pipe-cleaner palm trees to the scenery after our islands were finished.   Our plan is to paint them next week.  We'll see if I actually follow through with it.  The idea of all those kids wielding paintbrushes in my dining room has me nervous.  

Want to share our Nim's Island adventure? Join our Flickr pool to allow your kids to join in the discussion, and share their own photos and videos.

Saturday, July 18, 2009

I Can't Believe My Eyebrows!

There are times when I see my children sweetly sleeping in their beds and I know that I am blessed.  I will tuck a wisp of dark hair behind a tiny ear or pull up the blankets to cover my all-too-quickly-growing baby and I think just how amazing is my job of being their mother.  And then they wake up . . .


~  Oldest coming down the stairs after nap. "Mommy, I'm sorry for talking with my mouth full."   Confused, I asked what she was eating and she replied "pretend bread."


~  Son when told he couldn't have a cookie.  "That's not a good punishment.  I want a different one.  When you punish me like that it makes me sad."  


~ Oldest: "Math is fun!" - this can't be my child!


~  Son in very pathetic voice, "I caaaannnn't get dressed.  I'm too cold!"


~ Oldest when leaving a toy pyramid for a moment "Mom, please don't lick it while I'm gone."  Umm . . . okay ???


And my favorite silly comment:

~  Oldest when told she could eat at McDonalds,  "I can't believe my eyebrows!"

Wednesday, July 15, 2009

Nim's Island Lessons - Chapter 2

~ Wind ~

We started our second week of Island School today by listening to a fun  live island radio station (where, btw, they have help wanted advertisements for the United States CIA clandestine services  - anyone else thinking YIKES).  The kids all enjoyed the fun sounds of the islands while the tiny babies were fed.

This week our focus has been the wind.  "It howled at the door and screamed through the windows; it laughed at Nim because Jack wasn't there, and she didn't know if it was just teasing her or was going to grow into a tree-throwing, hut-smashing storm."   

After reviewing the location of the tropics and it's warm climate,  I explained to the kids how wind forms
  1. The sun warms the areas near the equator more than the areas closer to the poles, therefore the tropics are much warmer than we are at home.
  2. As the Earth warms up, it heats the air above it.
  3. Warm air rises, and as it does so air from elsewhere moves in to take it's place.  This motion is called WIND
The kids were asked to think of some of the jobs of the wind.  Eventually reaching the conclusion that the wind is a source of ENERGY.  


We set up this simple wind & wave experiment.  We discussed how the wind's energy creates WAVES and how waves differ in deep vs shallow water.  The experiment was fun, but we would have needed a much bigger pan to really demonstrate the principle well.  To better illustrate it we showed the kids this great animation of the same principle  (it is the 3rd illustration on the page - make sure to poke around on this site.  There are lots of great activities & games).    

We watched the dramatic effect that waves and wind can have by viewing two videos at the hurricanes site of How Stuff Works.  The kids enjoyed comparing the difference between this hurricane footage and the video shot by Sarah that we looked at last week.  


Professor H's activity video explained that our craft for the day was to make some of Nim's weather measurement equipment.  Specifically, wind-vanes to "measure" wind direction.  Our only addition was a large compass at the base.  This not only made our windvanes more useful, but it also gave us another review of compass directions.  We used a printable compass that we found on Homeschool share.  Afterward we built our own pinwheels and discussed in the very briefest way that that anemometers measure wind speed.  


The printables from the Currclick class have been fabulous if you have the kind of kid who enjoys making lapbooks (and mine love them).   If you haven't registered yet, I highly suggest that you do.  You won't be disappointed.   

Here are a few additional printables:

Want to share our Nim's Island adventure?  Join our Flickr pool to allow your kids to join in the discussion, and share their own photos and videos.

Monday, July 13, 2009

Easy Barn Birthday Cake

My little sis has asked for instructions on how to make a barn shaped cake for my nephew's birthday.

When my own little boy had his first birthday (it seems like a lifetime ago now) I decided to go with a farm theme. I looked at lots of cakes, but they all seemed either too flat (just stick a barn toy on sheet cake) or far too complicated for this wanna-be cake decorator. That is, until I found this one.

~ The bottom layer is a simple 9x13 pan.  I frosted the top 2/3 with white icing and then sprayed blue food coloring to give the sky some variation.  The bottom third was frosted in green with a few "Plants" piped on.  (ignore the colors in this photo - I'm not sure why they came out so wacky)

~ The second layer is made out of a square 9x9 pan.  I cut the top to make it into a barn shape and then piped the whole thing in red stripes for the barn boards and black for the roof.  

~ The silo is made out of Keebler fudge stripe cookies.  I cut them so that they had one flat side, (removed approx. 1/3) and then "glued" them into an eight inch column using melted chocolate chips (don't try to use frosting, it isn't stiff enough to maintain the shape).  After the cookie column dried I placed it beside the barn and iced it in the same red color.  

~ The barn doors are made out of graham crackers piped in white stripes.  I then piped on some of the same black color from the roof to add the details.  
 
~ The horse (or whatever other animal you imagine it to be) is an animal cracker with white icing applied very roughly to make its "fur,"  and the field stones are chocolate candies that I had left over from a cake I made for my dad.  

The lines aren't straight, and my techniques are all very wobbly, but everyone knew that the cake was supposed to be a barn, and it tasted yummy - mission accomplished.

Sunday, July 12, 2009

Urachal what???

We traveled to Boston for our 11 week-old's urachal surgery on Friday, and she is back home and doing well after an exhausting 15 hour day.  The procedure took longer than we originally expected, but with great results - it did not involve either her bladder or intestines.  She is still a bit sore, but otherwise is on the mend.  Thank you for your prayers!
For those of you who are like me and have never heard of a body part called the urachus before, here is the short version - when baby was born her umbilical cord had ducts through which she was attached to mom.  The duct attached to the bladder is called the urachus.  These ducts were supposed to shrink and then disappear as her bellybutton formed.  With our little one, this didn't happen properly, so the surgery's purpose was to prevent infection by removing those umbilical remnants.  There is a more complicated description here for all of you scientific-minded folk.

Life has been moving pretty fast lately, so if you see any of us spinning in circles please catch us and send us home.  I am always amazed at how much work these lovable little people are.

Wednesday, July 8, 2009

Nim's Island Activities - Chapter 1

~ The Tropics ~

We have been looking forward to the Currclick live class about Nim's Island for quite a while now.  Unfortunately, the first posting is later than I expected, so we decided to "wing-it" on our own this week.  I poked around the internet (finding a few other class members in the process) and decided that we would focus on our studies the Tropical climate.

I pulled this map of the tropics, along with this one which shows the current weather, and we discussed where the tropics are, what kind of weather they have and why, and had a long discussion about hurricanes.  I got a lot of background information from Laura's unit over at HomeschoolShare.  The highlight was watching Sara's weather reports on youtube - a young meteorologist in the making.  

Afterwards we traced one of the girls and the kids used the first two paragraphs of the book to make a large poster of Nim, complete with lots of wild hair, bright eyes, and the three cords around her neck (I couldn't find my velcro, so the spyglass etc will be stuck on later).  We then talked about what kind of clothing we thought Nim should wear - short sleeves to keep her cool, boots to protect her from the rough rocks of the "fiery mountain" etc.  They had a lot of fun with this one, and I am sure we will add to our picture as we go along.


The kids were each given three necklaces like Nim's.  One with a spyglass (paper tube), another for the knife and sheath (laminated photos from google images), and a whistling shell (plastic whistle with a seashell sticker).   They were told that these are their SPECIAL cords, and that they can wear them only when we are reading the book.  Whenever Nim uses one of the items on their cords they will be able to act it out with her.    We spent a lot of time spying pirate ships through our spyglasses and whistling for help :-)


Our final activity was to color a map of Nim's Island.  We talked about compasses and how on this particular map North was not at the top.   The kids had fun pointing out the tiny animals and coloring certain areas of the map really dark to "hide" Nim.  

This is going to be a fun unit!  

Friday, July 3, 2009

4 Year Old Fashion

My son has become a fashion curiosity lately.  He is currently wearing lederhosen.  And he is happy.  Not just a little happy, but that 4-year-old thrilled-with-everything-life-has-to-offer kind of happy.  He is happy because his outfit has green piping (his favorite color).  He is happy because he is wearing something that causes adults to stop and talk to him in the grocery store.  He is happy because he chose this outfit himself.
Yesterday he wore two ties and a puffy down coat (it is summer!).  The day before it was three ties but I forgot to take his photo.  

And before that, it was overalls with a sweatshirt AND a sweater vest - backwards.

Before that?  Jeans, a collared shirt, a tie, suspenders, a belt, baby shirt clips, and a broom tucked into a backpack (yes he really did wear all of this for hours and hours).  

Wanna' know why he is so snazzy and pleased with himself?  Because Mom finally released control.  Yup!  I did it.  I have decided that no matter where we are going or what we have planned, my 4 year old will choose what he wears, and suffer with (or revel in) the result.  It has been a comical journey.  

Oh and what could be better than wearing lederhosen on a random Friday?  How about lederhosen and a color coordinated green cape!  :-)


By the way, just for the record I am currently wearing jeans and a cotton tee-shirt.  They don't make me very happy.  I wish I was 4 again!